These are features we always setup for the valued benefits:
- Enable Snapshots
***A Snapshot is NOT a Backup
Snapshots are great for Ransomware protection and to quickly restore accidental modifications and file deletions.- Open up “Snapshot Replication” app. If needed, install from the “Package Center” App.
- Select “Snapshot” on left hand side.
- Select the share you want to enable Snapshots and click “Settings” button in the top bar.
- Check box to “Enable snapshot schedule” and edit schedule as desired.
- Options are dependent on storage availability and needs.
- Open up the “Retention” .
- Check the box “Enable retention policy” and time settings.
- Question is how long will you want access to the previous data before it is remove from Disk
- Click “OK” to save changes.
- Set Data Reclamation Time Frame
To reclaim the space from deleted data and snapshots on your volume, Data Reclamation needs to take place but can cause performance degradation. To keep this from interfering during work hours it is good to practice to modify the Time Frame it runs.- Open up “Storage Manager”.
- On the left, select a volume under “Storage”.
- Click “Global Settings” in the top section.
- Under the section “Space Reclamation Schedule”, click on the “Set Time Grid” button.
- Set Time Grid so that Space Reclamation only works during off hours and none work days and click “OK”.
- If Space Reclamation is not completed by unapproved time (work day), it will automatically pause and resume at approved time.
- Click “Save” to save your changes.
- Enable File Fast Clone
With this enabled, when duplicating a file on your Synology NAS, it will not increase the amount of used space until one of the duplicated files is modified.- Open Control Panel.
- Select “File Services” on the left.
- Select the “Advanced” tab on the top.
- Check the box for “Enable file fast clone”
- Click “Apply” to apply the configuration.
- Enable Data Scrubbing Schedule
Data scrubbing is very important to guarantee the integrity of your data. It will validate all the data on the disk with its matched Checksum. If there are any discrepancies, it will proceed with correcting the data corruption automatically.- Open up “Storage Manager”.
- On the left, select the volume under “Storage” that snapshots are stored on.
- Click on “Schedule Data Scrubbing” in the top bar
- Check the box “Enable data scrubbing schedule”.
- Check the box for the storage pools this will affect.
- Select the desired frequency
- Recommend “Repeat Monthly” or “Repeat every three months”
- Check the box “Run data scrubbing only during specific periods”.
- Click on “Set Time Grid” button
- Set so scrubbing only works during off hours and none work days and click “OK”.
- If scrubbing is not completed by unapproved time (work day), it will automatically pause and resume at approved time.
- Click save to set configuration.
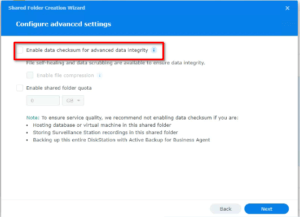
- Enable Data Checksum for Advanced Data Integrity
***This can only be enabled or disabled at the time of setting up a Share
*** Do NOT enable for Surveillance Station folders
*** Required for Compression (next section) to be enabed- Open up the “Control Panel”.
- Select “Shared Folder” on the left hand side.
- Select “Create” -> “Create Shared Folder” in the top section.
- During the setup process enable the option “Enable data checksum for advanced data integrity.

- Complete setting up the Shared Folder to complete.
- Enable Data Compression
This can me resource intensive depending on what data is being saved and how often it is read and written to. Recommend only File Shares. Do not use for Surveillance Station Folders.- Open up “Control Panel”
- Select “Shared Folder” on the left hand side.
- Select the desired share and click the “Edit” button.
- Open up the “Advanced” tab.
- Check the box for “Enable file compression”.
- Option will be disabled if “Data Checksum for Advanced Data Integrity” is disabled.
- Click “Save” to apply the changes.

